We are in for a treat on January 31, 2018 when we will be graced by the rare celestial occurrence of a simultaneous super moon, blue moon, and total lunar eclipse. This event is one to photograph because we’re talking about a…
SUPER: A moon that is closer than usual to the earth is called a super moon. Super moons appear larger and brighter than normal. This boost in brightness is especially helpful for photographing the Blood Moon, which is much darker than other phases of the lunar eclipse.
BLUE: A full moon that occurs twice in a calendar month is called a blue moon. There is nothing photographically interesting about blue moons except for their increased “rare celestial occurrence” cred.
BLOOD: At peak eclipse, the moon falls completely behind the Earth’s shadow and becomes an amazing shade of orange and red.
MOON: Always a fascinating subject to photograph.
Photographing a lunar eclipse can be an easy and fun project for all levels of photographers, from beginner to pro. In this tutorial we’ll cover the basics on how to plan, shoot, and post process a lunar eclipse in a way that is accessible for all skill levels.
For advanced photographers, feel free to scroll down to Advanced Lunar Eclipse Composition Techniques to learn how to plan a lunar eclipse shot with a landscape or landmark element in the foreground using PhotoPills and a bit of trigonometry. I've also illustrated how to use this GOOGLE DOCS SPREADSHEET CALCULATION TOOL created by me for use in tandem with PhotoPills to plan shots involving the sun or moon in complicated mountainous terrain.
![Super Moon / Harvest Moon / Blood Moon / Lunar Eclipse | September 27, 2015 | [Purchase]](https://images.squarespace-cdn.com/content/v1/55162f47e4b0d6bbb549d4e2/1515882326361-0RTZ7CA368SMIJYOB4U3/BloodMoonEclipseMountShuksan.jpg)
Super Moon / Harvest Moon / Blood Moon / Lunar Eclipse | September 27, 2015 | [Purchase]
Let’s talk about equipment.
Nice gear always helps, but you can still get a good image on an entry level camera with a long lens and manual controls. Because the moon is dark at peak eclipse and relatively small in size, the most critical attributes of your camera setup are the focal length (magnification) and stability. Fancy lenses with large apertures and camera bodies that perform well at high ISOs are helpful, but secondary in importance.
Focal length:
It may be pretty obvious that the size of the moon depends on the focal length of the lens, however it’s difficult to know just how much of the frame will be covered by the moon without stepping outdoors on a full moon and snapping a picture. For those of us who live under permanent cloud cover (hello fellow Pacific Northwesterners), here is a rendering of how the moon will fill the frame at different full-frame 35mm equivalent focal lengths*:
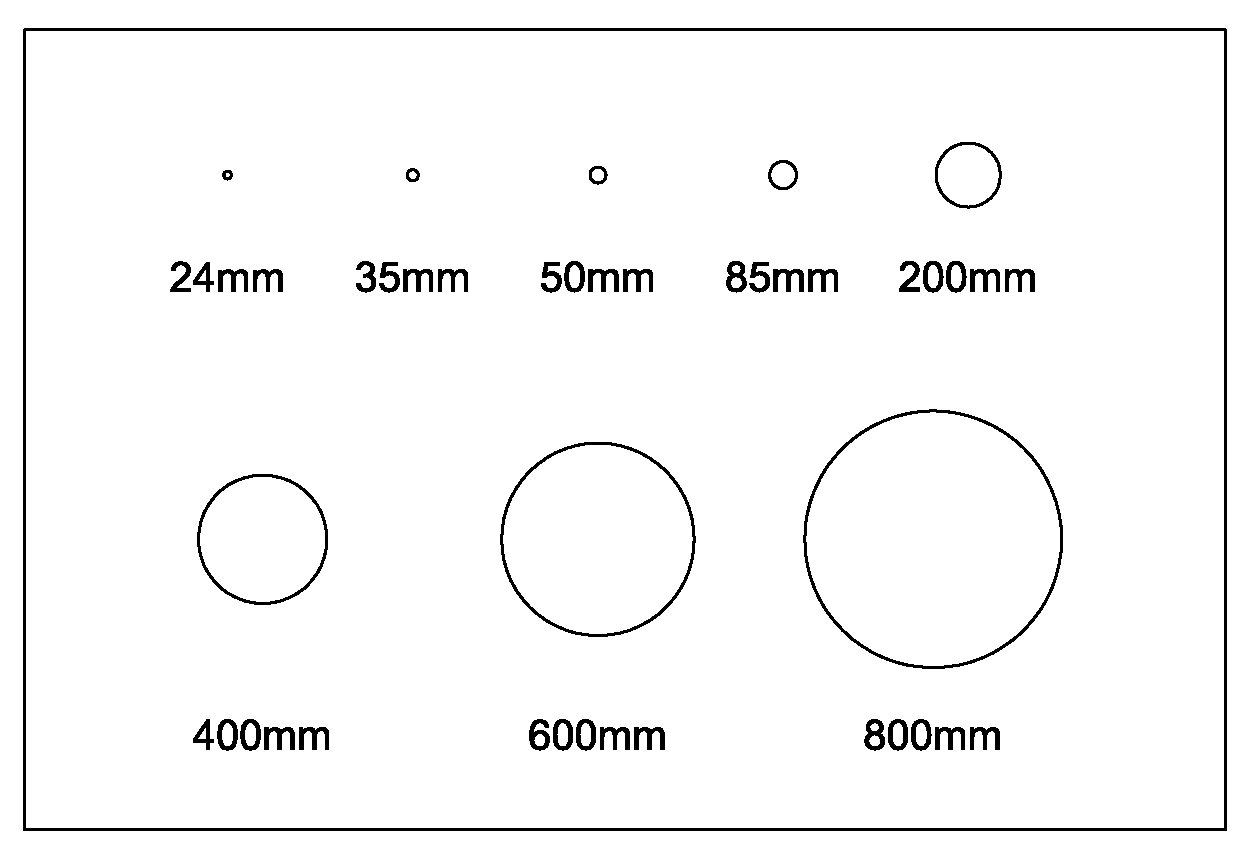
Moon sizes at various focal lengths (35mm full-frame equivalent)
*How to find your equivalent focal length if not using a full-frame camera:
Step 1: Google "[your camera’s make/model] crop factor.”
Step 2: Plug them into this equation:
Equivalent 35mm Focal Length = Focal Length [mm] * Crop Factor
Now before you go out and buy a 800mm lens and a 1.6x teleconverter for $17,000, remember that a well-shot image can be cropped down a bit without sacrificing too much image quality.
Additionally, you can increase the resolution of your image by using a method called image stacking, which is described in a very easy to understand manner in Tony Northrup’s tutorial. Image stacking is an amazing method of sussing out extra resolution and detail on static (non-moving) subjects. If you're interested in seeing how this works, check out The Photon Collective's excellent educational video.
Stability:
A nice, heavy tripod and a remote shutter release (or 2-second timer) are critical to minimize blur caused by camera shake. If a tripod is not available, try getting creative, such as by resting the camera on a sweatshirt or beanbag on the roof of your car. You will need to either engage a 2+ second timer on your camera or to use a remote shutter release as the movement caused by pressing the shutter button will result in a blurry image when shooting the moon when it is darkest at peak eclipse.
Yeah but what are my camera settings?
See below for a summary of my recommended camera settings. If you're not sure how to adjust your settings accordingly, Google is there to help. If you're not familiar with your camera's functions, I strongly suggest learning how to adjust these settings a day or two in advance.
Basic Settings:
RAW. Shoot in RAW if you have access to post processing software such as Photoshop, Lightroom, or Apple's iPhoto. This will allow you to make far more serious corrections and adjustments to your image without pushing the limitations of the much more compressed JPEG file format.
MANUAL FOCUS. Use manual focus via Live View if at all possible. If your camera does not support Live View manual focus, your camera should be ok when the moon is at partial phase but it will likely be unable to focus on the Blood Moon (the moon at peak eclipse) due to the lack of light. Try using autofocus to lock your focus on a street lamp or something else that is bright and very far away, then swing the camera up to the blood moon and take your shot. Note that if you have to employ this method, your AF mode should be set to AF-S.
MANUAL SHUTTER SPEED, ISO, AND APERTURE. Yes, I know this is beyond some of your comfort zones. To help make life a little easier, start with these settings*:
Full Moon: 12.64 EV (or 1/200s, f/11, ISO 400)
Crescent Moon: 11.64 EV (or 1/100s, f/11, ISO 400)
Blood Moon (peak eclipse): 1.33 EV (or 1/2s, f/6.3, ISO 3200)
If your lens is unable to achieve these apertures, match the listed EV (exposure values) with different settings by using this handy calculation tool. Note that if you are concerned about camera shake, you can also increase the shutter speed by modifying the aperture. Try throwing some numbers in there and see what happens.
*Keep in mind that the image on the back of your camera can appear to be misleadingly bright when viewed in total darkness. I have way too many underexposed Milky Way shots because of this phenomenon.
2-SECOND TIMER OR SHUTTER RELEASE CABLE. As described above, you will need to either engage a 2+ second timer on your camera or to use a remote shutter release. Without employing the use of a timer or remote shutter release, the movement caused by pressing the shutter button will result in a blurry image when shooting the moon at peak eclipse.
OK, let's plan this thing:
When the heck is this eclipse you keep talking about anyway? Use Time and Date to read up on the eclipse and the important times of each event relative to your region. Note that you may have to punch in your location to get the times to show up correctly.
Keep and eye on the weather. The best way to gauge the viewing conditions is to head over to Clear Sky Chart, where you can see the forecasted cloud cover, visibility (transparency), and darkness (moon phase related). An iOS app is also available.
What kind of shot do you have in mind? Do you want a shot of the blood moon by itself? Do you want to take photos of the entire event and stitch all of the phases together in a single photograph? Do you want to include some sort of landscape element or landmark in your photo? If looking to do something a little more advanced, consider moving on to Advanced Lunar Eclipse Composition Techniques further down in the tutorial.
Consider taking multiple shots for image stacking. As described earlier in the tutorial, you can increase the resolution of your image by using a method called image stacking, which is described in a very easy to understand manner in Tony Northrup’s tutorial. Image stacking is an amazing method of sussing out extra resolution and detail on static (non-moving) subjects. If you're interested in seeing how this works, check out The Photon Collective's excellent educational video.
Advanced Lunar Eclipse Composition Techniques
Now THIS is the fun part. If feeling adventurous, you could try including a foreground element such as a landscape, mountain peak, bridge, or building. While it will take some additional legwork, this is a manageable task for those willing to put in the time.
To follow this part of the tutorial you will need:
this Google Docs Spreadsheet Lunar Eclipse Calculation Tool by me!
and the PhotoPills app by, uh, PhotoPills.
PhotoPills' lunar eclipse tutorial
PhotoPills is an incredibly powerful iOS and Android app for planning shoots in advance when you need to know where the sun, moon, or Milky Way core will be at any given point of time. My image of the 2015 blood moon rising over Mount Shuksan was planned using this indispensable app. In this section I'll go over my method to getting this shot. All of these steps can be easily replicated for this year's Lunar Eclipse.

Figure 1: PhotoPills Planner for the 2015 Super Harvest Blood Moon

Figure 2: Mount Shuksan from Picture Lake. The red outline represents the peak used as the foreground during the blood moon shown in Figure 4.

Figure 3: PhotoPills AR Viewer to fine tune your composition on-site.

Figure 4: Super Harvest Blood Moon rising over Mount Shuksan, shot at 400mm.
Step 1: Open the planner and adjust the time and date to find the general direction and elevation of the moon during phases of the lunar eclipse [Figure 1]. From here we can see that the 2015 Blood Moon (the narrow cyan line) occurred ESE from 2.1 to 14.7 degrees in elevation. FYI the January 31, 2018 Super Blood Blue Moon will occur due East 14.3 to 26.7 degrees relative to the horizon in the Seattle region.
Step 2: Brainstorm landmarks or landscape elements that would be complementary in the frame. With the info obtained in Step 1, I thought of hiking trails or roads with photogenic mountain peaks looming to the east at about 6-10 degrees from the horizon. One idea was to see if the 2015 Blood Moon would rise over Mount Shuksan from a point along the Artist Point or Picture Lake trails [Figure 2]. It is best to find multiple location possibilities within a large radius from your base of operations to minimize weather impact, but we will continue with only the Mount Shuksan example for simplicity.
Step 3: Find the elevation of Mount Shuksan and then use Google Earth to check the elevation of points along the trail and distance from Mount Shuksan's peak from using Google Maps.
Step 4: Did you know that Excel is a mechanical engineer's best friend? Well now you do. Click here to use a spreadsheet I've created to plug in the distances, elevations, and eclipse details obtained from PhotoPills, Google Maps, and Time and Date [9.27.2018] [1.31.2018]. If the elevations check out, try to refine the approximate trail location and elevation by iteratively checking both PhotoPills and Google Maps for moon direction and elevation.
Step 5: Leading up to the day of the shoot, check Clear Dark Sky to verify the conditions are still bueno.
Step 6: While on-site, use the AR Viewer [Figure 3] to fine-tune your composition. It's best to do this well in advance while there is a sun or moon visible in that general direction. Photo Pills is only as accurate as your phone's GPS, compass, and accelerometer, but it does have a calibration tool that allows you to adjust the sun/moon tracker based on the current location of the sun or moon.
Step 7: Once you have everything set up and have finalized your composition, you just have to wait for the magic to happen. That said, BE PREPARED TO MOVE. Any inaccuracy in Photo Pills' calibration may require you to make final adjustments with your feet. If everything worked out as planned, awesome job! Feel free to press that shutter release [Figure 4].
Post Processing Tips
Coming soon.
Good luck, and please drop me a line if you found this tutorial to be useful! Also, while you're here, don't forget to check out my portfolio.